mRockstar–An Upcoming Social Network Site

mRockstar.com, it’s social networking website plus a music based community. The pre-phase of the website was launched on April 5, 2011 to let people reserve their mRockstar Usernames

Comodo Internet Security 2011 Pro 1 Year License Key

If you buy this product from the Official Webpage, it will cost you more than $49 per year. But now you’ve got a chance to get it for absolutely free. You don’t need any license key for this package because it has already been integrated with the package. Just download it and you’ve a fully featured Internet security system which will protect your PC from Viruses, Trojans, Malwares, Hackers and every type of threat that can harm your computer. Grab this offer

Download Avast 6 Home Edition 1 Year License Key

Avast antivirus is one of the top leading antivirus and it is available for free download.You will get a fully functional 30 day trial version of avast if you download directly from their website.To activate it for one year you need to register with them.Once registered you will get your Serial license key into your mailbox.

How To Hack Closed PC On Cyber Cafe


So here is a quick new hack on how to intrude in the PC which is shut downed at Cyber cafe. (Don’t Forget to read our disclaimer at the bottom of the post.)
1. As you all must have know these days all Cyber cafe owners have a program for administration to control all PC’s in local area network. So all files can be inter transmitted.
2. First of all press Ctrl+Alt+Del the task manager or any controlling application, will open. Then from APPLICATIONS select the program that is controlling all PC’s  & terminate it, This is for security reason. Now log of PC, & you ll get user names of the PC.
3. But some times, cyber cafes have security clients installed that have restricted access to Task Manager, restart the computer & press F8 continuously before windows boots.
The Menu will open, select Safe Mode from it. And now you can copy files from networked PC’s without any  security layer.
Next step is where you’ll need to crack the hashes.  SO go to your home PC , Download & install Saminside cracking tool. And from some another Cyber cafe try to crack the hashes of that PC. By same log off method explained below.
This where you actually perform hacking. Have a gret time & tell us weather it worked for you.
Meanwhile if you can get IP address,  of the PC you wish to hack try to get it from ip-explorer.com, but this is not the part of this hack its sort of next step of hacking from outside the network.
Disclaimer : The trick here explained it for educational purpose only & not to  perform illegal or criminal activities. Don’t forget hacking into some one’s privacy is considered as crime. SO do it on your home network that you own or something.  We are not responsible for anything you do & consequences of it by using our articles.

Hacking With Nmap – The Network Mapping Tool

Nmap is most widely used port scanning & network mapping tool used widely by network administrators & security administrators to scan their ports for potential vulnerabilities. If you are not aware of Nmap & you don’t have it then you can download it here for both Linux & Windows.


Nmap Hacking Theory

Following are the states that ports are available in
1. Open                                 Closed
2. Filtered                           Unfiltered
3 .Open / filtered           Closed/unfiltered
Scanning through Nmap gives you list of ports that are opened or filtered. Most of closed ports are not disclosed as there are almost 65000 ports in a computer for communication.
(Filtered packet : It means the data packets that are sent or received are filtered by firewall to secure it.)
Ok, So ready to hack with Nmap,
There are three types of basic scans you can perform on ports which is as follows :
SYN Scan : It is the most simple & common scan that is used to scan for ports. The scan results are very faster compared to other types , but it gives generalized results.

FIN Scan : FIN scan can detect if any kind of filtered packets or weak firewalls, and warns attacker to create stealth for attacking the victim network.

ACK Scan : Filtered and unfiltered ports can be scanned with this type of port scan. It is the most advanced scanning done with nmap.

Hacking With Nmap

So let us start with commands of Nmap operation in Linux:
SYN scan :
For scanning www.sampledomain.com
Type in your terminal of linux:
#nmap -sS -T4 www.sampledomain.com         (replace domain or IP you wish to scan at sampledomain.com)
Result will be having three tables :
Port                           State                                 Service
This will give you port number its state open?filtered like that & services will give you what is service running on that ports.

FIN Scan :
#nmap -sF -T4 www.sampledomain.com         (replace domain or IP you wish to scan at sampledomain.com)
Live host & filtered ports are found out with this method
ACK Scan :
#nmap -sA -T4 www.sampledomain.com         (replace domain or IP you wish to scan at sampledomain.com)
All closed ports are eliminated with this ACK scan. And you’ll only see ports that are up for attack.
So this was a basic Nmap hacking or port scanning tutorial. You can also find OS running, web server & mail server scanning & this data can be used as Passive attack gathering stage which we have discussed in pre attack stages.

Windows 7 Cheat Sheet

As you all know Windows 7 RC3 is launched. Here’s a little cheat sheet I made up for some of the handy new hot key combination, many of which I’ve become quite dependent on!


From Desktop

  1. Windows Key + Tab : Aero [press Tab to cycle between Windows]
  2. Windows Key + E : Windows Explorer is launched.
  3. Windows Key + R : Run Command is launched.
  4. Windows Key + F : Search (which is there in previous Windows versions too)
  5. Windows Key + X : Mobility Center
  6. Windows Key + L : Lock Computer (It is there from the earlier versions as well)
  7. Windows Key + U : Launches Ease of Access
  8. Windows Key + P : Projector
  9. Windows Key + T : Cycle Super Taskbar Items
  10. Windows Key + S : OneNote Screen Clipping Tool [requires OneNote]
  11. Windows Key + M : Minimize All Windows
  12. Windows Key + D : Show/Hide Desktop
  13. Windows Key + Up : Maximize Current Window
  14. Windows Key + Down : Restore Down / Minimize Current Windows
  15. Windows Key + Left : Tile Current Window to the Left
  16. Windows Key + Right : Tile Current Windows to the Right
    [Continue pressing the Left and Right keys to rotate the window as well]
  17. Windows Key + # (# is any number) : Quickly Launch a new instance of the application in the Nth slot on the taskbar. Example Win+1 launches first pinned app, Win+2 launches second, etc.
  18. Windows Key + = : Launches the Magnifier
  19. Windows Key + Plus : Zoom in
  20. Windows Key + Minus : Zooms out
  21. Windows Key + Space : Peek at the desktop

From Windows Explorer

22. Alt + Up : Go up one level
23. Alt + Left/ Right : Back/ Forward
24. Alt + P : Show/hide Preview Pane

Taskbar modifiers

25. Shift + Click on icon : Open a new instance
26. Middle click on icon : Open a new instance
27. Ctrl + Shift + Click on icon : Open a new instance with Admin privileges
28. Shift + Right-click on icon : Show window menu (Restore / Minimize / Move / etc). Note: Normally you can just right-click on the window thumbnail to get this menu.
29. Shift + Right-click on grouped icon : Menu with Restore All / Minimize All / Close All, etc.
30. Ctrl + Click on grouped icon : Cycle between the windows (or tabs) in the group
Though some of them are there in previous versions of Windows, Windows 7 has incorporated many of them and have started many afresh.

20 Facebook Tips/Tricks You Might Not Know

  • How to Place Facebook Chat On Firefox Sidebar

If you are using Firefox, you can place the Facebook Chat at the sidebar.

  • How to Download Facebook Photo Albums

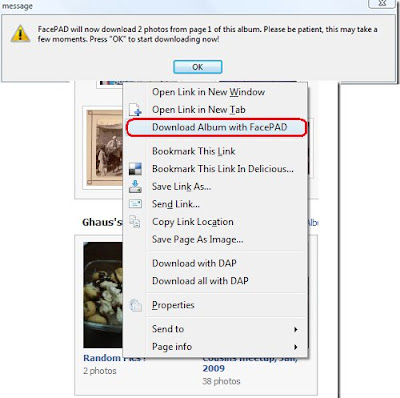
FacePAD: Facebook Photo Album Downloader allows you to download your friends’ facebook albums, Events albums, and Group Albums, en masse, with the click of a button.

  • How to Share Flickr Photos to Facebook

Flickr2Facebook is an unofficial Flickr to Facebook uploader(bookmarklet) which allows you upload photos to Facebook from Flickr.
  • How to Update Facebook without Using Facebook

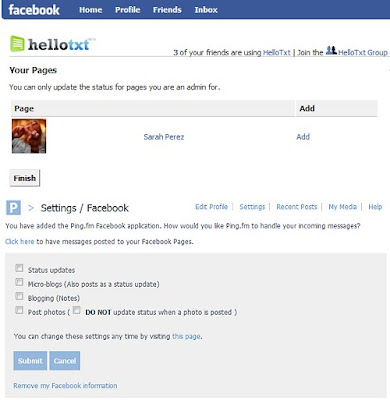
hellotxt and Ping.fm both introduced features that let Facebook administrators update Facebook Pages.
  • How to Schedule Facebook Messages

Sendible lets you schedule Facebook messages ahead of time so you can send messages to your friends, customers or colleagues in the future.
  • How to "Friend" Someone on Facebook & Hide It From Your Status Updates

A short tutorial on Makeuseof to guide you how to hide Facebook status updates and keep that fact confined to your closer friends.
  • How to Create a Photo Collage Using Pictures of Your Facebook Friends

Click on Friends tab. Proceed to More tab. From "Choose an option" dropdown, choose any of the dashes "" . Your Facebook friends collage is right on your computer screen.

  • How to Know When Facebook Friends Secretly Delete or Block You

This service has been discontinued. X-Friends is a unique tool for tracking friends that disappear from Facebook.

  • How to Display Selected Pictures Only on your Facebook Profile Page

A little-known feature in Facebook that lets you decide who shows up in that Friends box. Click that "edit" pencil in your Friends box and type the names of your best friends in the box that says "Always show these friends"

  • How to Remove Facebook Advertisements

This Greasemonkey script – Facebook: Cleaner removes many of the annoying ads and updates that unavoidably appear on your Facebook pages.

  • How to Syncs Photos of Facebook Friends with Contacts in Microsoft Outlook

OutSync is a free Windows application that syncs photos of your Facebook friends with matching contacts in Microsoft Outlook. It allows you to select which contacts are updated. So you can update all contacts at once or just a few at a time.

  • How to Display Facebook Statuses on WordPress Blog

The following method make use of Facebook status feed and WordPress RSS widget to display Facebook Statuses on WordPress blog.. It will also work for self-host WordPress blogs.

  • How to Post Your Blog Posts to Your Facebook Wall Automatically

Wordbook allows you to cross-post your blog posts to your Facebook Wall. Your Facebook “Boxes” tab will show your most recent blog posts.

  • How to Access Facebook Chat on Desktop

Gabtastik and digsby let you keep Facebook chat sessions open on your Windows desktop outside of your regular web browser, using minimal screen real estate and system memory.

  • How to Create Quiz on Facebook Easily

LOLapps provides quiz creator that can be employed to conjure up these popular personality quizzes that are so widespread in Facebook.


Facebook has integrated friends list with Chat and you can also choose which of these list members get to see you online.

  • How to Get Facebook Updates on Email

NutshellMail consolidates your Facebook accounts through the inbox you use the most.

  • How to Update Facebook Status from Firefox

FireStatus is a status update utility for multiple social networks, including FaceBook.
  • How to Get Facebook on Your Desktop

Seesmic Desktop, Facebooker, Xobni, Facebook Sidebar Gadget, Scrapboy and Facebook AIR application are desktop applications that allows you interact with your stream just as you would on Facebook, but without the browser


Remaining Space for your blogger images

Google has added a new feature in Blogger. Now you can check the space used by the images of your blogger blog. Actually the images which you post in blogger blog are stored in Picasa Web Album.
While composing a post via blogger.com web based blog editor, just click on the 'Add Image' button.
This opens a popup window which allows you to upload photos. At the botton of the window, you can see the used space of your Picasa account.

Remaining Space for your blogger images

By Arpit On Saturday, March 31, 2007 At 5:50 AM


Google has added a new feature in Blogger. Now you can check the space used by the images of your blogger blog. Actually the images which you post in blogger blog are stored in Picasa Web Album.
While composing a post via blogger.com web based blog editor, just click on the 'Add Image' button.


This opens a popup window which allows you to upload photos. At the botton of the window, you can see the used space of your Picasa account.


Google by default gives 1 GB storage limit per blog.

Add Theme to Google Personalized Homepage.

Google has recently added the theme feature in Google Personalized Homepage. (The URL for Personalized Homepage is http://www.google.com/ig?hl=en).

To add a theme in your Personalized Homepage just click the 'Select Theme' option in the upper right.
 You can choose among any of six available themes. After selctin the theme a box will appear which asks for your location.
You can provide your location by giving your city and state or zipcode. The selcted theme will dynamically change depending on the season, time of day and weather conditions of your current location.

Here is the preview of all the six available themes.


Type in Hindi in Google Blogger Blogs

Now you can type and publish your blogpost in Hindi in your blogger blog. Google added the feature of English to Hindi translation in Blogger.
For example you can type 'Mera Bharat Mahaan' in Hindi. (My India is Great)

मेरा भारत महान

With this feature on, just type the word in roman script (as it is pronounced) and as soon as you hit space key or any puntuation button, the word will get translated to Devanāgarī characters.

Here is a brief tutorial of for using this feature in Blogger.

To turn on this feature, go into the Setting (Basic) of your blogger blog and select yes for the transliteration option. now save your settings.
Now start composing a new post. In the post editer screen, you will see a new button 'अ'. Click this button to enable composing in Hindi.
Now write the words as they are pronounce. As soon as you hit the space key or any punctuation key, the word will convert into Devanāgarī characters.

If you want to edit a word in Hindi, just click to highlight it with left mouse button and you will see a drop down menu. select the word from drop down menu or select the option 'edit'.
Clicking edit button in drop down menu will show an advance editor. this editor also has a keyboard button in the right.


If you click this keyboard button, an onscreen keyboard button will appear, with which you can type the desired word.

Some important points.

1) If you type a word in roman and the hindi transliteration which appears is not the one you wants, you can edit it using advance onscreen keyboard. This transliteration will be saved and next time when you will type the same word in roman, it will translated correctly based upon your previous edit.

2) This feature is avaliable on Internet Explorer 6 or higher and Firefox 1.5 or higher. Also this is available for Windows Operating System. Transliteration facility is unavailable in Mac OS.

3) This feature requires live internet connection. All transliteration are done on Google server and are sent back to your browser.

4) This features involves complex text layout which is not turned on in every browser. Internet Explorer has this feature turned on by default, while other browsers require support for complex text layout. This Wikipedia article gives detail help on how to turn it on in various OS.

Here is the Devanāgarī-Roman Character Mappings:


How to Use Free Proxy with Firefox

Here is a complete Graphical tutorial for using Free Proxy with Firefox. By using a Proxy, you can browse internet anonymously. Also a proxy can be used for browsing blocked sites like Orkut and MySpace.

Step 1.
Find a list of free proxy. You can Google it out. One such list is here.

Step 2.
Now choose an IP address and port from this list. In this tutorial I have chosen IP: 195.175.37.6 and port: 8080. You can choose whatever you like.

 
Step 3.
Open Firefox and in the menu choose Tools and then Options.


This will open the Firefox Options window. Click on Advance Options.

Step 4.
Click on Network tab and the click Settings button under Connection.
Step 5.
In Connection Settings window, click Manual proxy configuration. Now enter the IP address in HTTP Proxy and Port address in Port. ( In this example HTTP Proxy address is 195.175.37.6 and Port is 8080).
Also check the box 'Use this proxy server for all protocols'.
 Click ok and your IP is set to desired Proxy.

You can use any online service to check your IP. Like check my IP is a site solely dedicated for this purpose. As you can see in the Screenshot below,my local IP is set to 195.175.37.6.

Get Kaspersky Internet Security 2011 Free With 1 Year License Key

Kaspersky Internet Security 2011 is one of the best security system for your PC. It provides everything that you need to stay safe and secure whether you work, bank, shop or play online. Kaspersky Spanish is offering 1 year license of Kaspersky Internet Security 2011 free for a  limited time.
The Kaspersky Internet Security 1 year license generally costs you more than $50 for 1 PC. But the good news is that, unlike that Chinese license key, this Spanish license key will work with English version of Kaspersky Internet Security.
1) Visit Kaspersky Spanish Promo Page here.
2) You’ll need to fill a form and in “Código promocional” you have to write the below code:
       c35e00be266f   


3) Fill the appropriate data in the form. The page is in Spanish Language but I’m putting the screenshot here to let you know what to write in the text boxes. Look at the below image.

4) When done, you’ll be said that ‘Thank you. You’ll shortly receive an E-mail containing your 1 year license key” in Spanish Language with the download link of Kaspersky Spanish Version But download it from that link.
5) Download Kaspersky Internet Security 2011 English Version from here and while installation, enter the license key you get in the email.
That’s it!! Now you have genuine Kaspersky Internet Security 2011 with a license key which will be valid till 1 year. Don’t miss this chance because this offer is only for a limited time and can become invalid anytime. Just grab this offer and get 1 year subscription of Kaspersky Internet Security 2011 for free.
Do let me know if you have got this offer. Do share this offer with your friends and family. Let them know about this offer.

Norton Internet Security 2011 Free For 90 Days

Norton Internet Security 2011 version 18 is the newest version of Internet Security from Symantec that works as an Antivirus, Antispyware, Anti Rootkit, Smart Firewall, Network Monitoring, Parental Controls, Norton Safe Web, Professional-Strength AntiSpam and Identity Protection. There is a good news for all who loves Symantec Products. Symantec is offering its Norton Internet Security 2011 free for 90 days.

Key Features of Norton Internet Security:
  1. Automated antivirus and antispyware
  2. Inspects websites to make sure they’re not fakes
  3. Helps secure and monitor your home network
  4. Protects valuable files from computer disaster
  5. Protects against the latest threats with a proactive, multilayered protection system
  6. Automatically finds and fixes problems that slow your computer
  7. Reduces scan time with smart scanning, so you can work and play uninterrupted
The software normally costs you more than $60 for a 3-user license for 1 year. But now you can get 3 month subscription of Norton Internet Security for free.
Download Norton Internet Security 2011 Free for 90 Days from here. Note that, you won’t need to use any license key or activation key to use it as it’s a pre-activated product from Symantec. This is a Norton Internet Security OEM setup installer provided in conjunction with ING Direct. When Installation done, it asks you activate the software but you have to skip that step to use it free for 90 days.

Download Norton Internet Security 2012 And Norton Antivirus 2012 Beta

A few days ago, Symantec, better known as Norton, one of the most trusted security vendor released its 2012 version of both Norton Antivirus and Norton Internet Security. These versions are currently in their beta stage. Beta stage is a pre-release version of the product that is available for public testing before the final version is released. If you’re a fan of Norton security system you can test both products i.e.  Norton Internet Security 2012 and Norton Antivirus 2012.
The company is providing free license of both the products for 14 days trial product key. It requires a free registration. Don’t worry, you don’t need to fill up a long form, it just requires an Email address where they can send you the license key. Once you register for Norton product, you’ll shortly receive an Email from the Symantec Software containing license key and download link of the product.
New Features:-
  • They have introduced SONAR Policy Enforcement to their new products. SONAR 4.0 technology is able to much more aggressively remove threats on pre-infected machines.
  • Reduction in footprint, resulting in smaller download and install sizes. Faster startup and shutdown.
  • You’ll notice that main window has been simplified for the users who only want to do two basic things: Run Live Updates and Run Scans.
  • Identity Safe 2012 supports storing your data in the secure Norton cloud.
  • This new version also supports Google Chrome browser, it means you will get the password and form-filling capability from Identity Safe, industry-leading phishing protection and SafeWeb site safety ratings for Web sites and search results
The license key will be valid till 14 days and if you like the product and want to extend your trial subscription, register again but this time with different email address so that you will receive a new license key that will extend your trial subscription to another 14 days. You can continue doing this after every 14 days till they launch the stable version of their products.
Download and try Norton Internet Security 2012 or Norton Antivirus 2012